
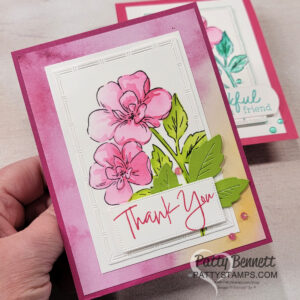
Your response to my “watercolor roses” post last week was overwhelming, and as promised, here are the instructions and a VIDEO TUTORIAL for you! 🙂
This technique originated with Crystal French from Denver, and was demo’d at the Stampin’ Up! Seattle Regional Seminar by Connie Ingram. Then Sandi MacIver shared the directions on a yahoo group… so I hope I’ve got this reasonably close to what Crystal had in mind… since I never saw the demo … it’s like playing the ‘telephone game’ and hoping you got it reasonably correct after the info passed through a few people 🙂
This is the 6×6 page my students will make in class this week in my Technique Book class:

Here are 2 other cards I made using this technique:

Instructions – see Video for more details:
- stamp rose image (from Fifth Avenue Floral Set) on Shimmery White cardstock using White Craft Ink
- heat emboss with Clear Embossing Powder and the heat tool
- generously spritz entire embossed image with water in a spray bottle – spray until there are puddles of water, not just wet paper
- use an Aquapainter to dip into drops of classic reinker and just “touch” the tip of the Aquapainter/ink to each section of the rose – ink flows inside each section (because of the embossing) but will also blend nicely when you touch more than one color to a section
- use 2 or 3 coordinating reinker colors in any combo you wish (classic ink)
- I used: Pretty in Pink, Pink Pirouette, Regal Rose, Cameo Coral and Summer Sun on the above samples
- clean Aquapainter tip in between applying each color
- let dry, cut out image and mount to card or project. They took approx. 20 to 30 minutes to dry – will vary by climate/weather.
- I used flowers from my garden for color inspiration – also check photos on google or any rose garden for color inspiration
Video Tutorial:
Now go have fun making your own beautiful roses!!!


Oh wow, Patty! You made this look so easy! Thank you for sharing this on your blog. I can’t wait to try this myself.
Patty,
Your watercolored roses are EXQUISITE!! I visit your blog regularly and always enjoy your creativity!
Nancy Ferb
Demo in IL
I can’t thank you enough for doing this video!! I’m going to try one right now!!
You rock, Patty, for letting us see this earlier than planned! I can’t wait to try it as the results are absolutely stunning!
WOW! Great flowers and awesome tutorial. TFS!
Patty, thanks so much for sharing this… I saw your samples the other day and could not wait to learn how to do this technique! Now I can’t wait to play!! : ) You are so generous to share all of these ideas with all of us out here in cyberland!
Patty, thank u so much for the great video & written tutorials for the roses. It is stunning & u made it seem so easy. I can’t wait to try it!
Absolutely beautiful Patty! Thank you so much for putting this video together!
Thanks so much, Patty! This is a beautiful technique!
Wow – this is SO gorgeous! This set is amazingly versatile. Great job on the video – you make it look easy. I will be trying this one out very soon.
Thank you for sharing *your* technique. The colors are truly amzing.
Wow!! Very striking! Thanks for taking the time to do a video tutorial on this project.
Ditto what everyone else says, this is the best video!! I have been wanting to try this and now I know what I will be doing tomorrow!! Thanks so much 🙂
Barb
This is a great tutorial Patty. I love the paper you ended up mounting the rose onto.
This is just beautiful! I’m new to stamping and card making and do not have embossing powder or heat tool. Do you think there would be a way to do this with only ink? Have a blessed day!!! Audrey
Patty, thanks so much for sharing this tutorial! You make it look so easy (and wonderful.) Melissa
Patty…..all I can say is WOWZA !!!!!!!!!! I made my flowers on the weekend and I can hardly wait to share the finished project with you !! If all goes well it will be completed today or tomorrow at the latest !!!
Thanks again…..you ARE the best !!!!
Wow! Are those roses gorgeous!
Patty thanks for doing this, It looks so good,thanks again for sharing, now i can go play
Eileen
Thanks so much for the tutorial Patty…a picture is always worth 1000 words.
Beautiful. Thank you for sharing. I can’t wait to show my ladies.
Patty,
Just beautiful. You make me try things I would never ever try.
Lyn
Patty, Your flowers are so BEAUTIFUL.I love the way you colored these. Thanks for sharing all your GORGEOUS Flowers.
Patty, your examples and tutorial are just phenomenal. Thank you so much for sharing this. Can’t wait to try. Definitely will be a hit in my clubs!! Fantastic. You’re the best!
Patty, These are gorgeous! Thanks so much for sharing how you made them!
This is just a fabulous technique and using the my #1 favorite new set in the catty! Thanks so much for sharing it, Patty. I can not wait to try it!
Wow, this is beautiful! Thanks for sharing how it was done.
Awesome – beautiful flowers! Thanks for doing the video-
patty–wonderful tutorial, and it has quite the WOW effect! i’m wondering if using shimmery white card stock is essential. if so, why?
also, did the paper flatten back out as it dried, or did you have to press it?
thanks so much…fantastic!
This is a such a great technique! It is rather simple, but has a HUGE WOW factor! I will be sure to show this to my customers! Thank you soooo much for sharing how to do this technique.
One word….magical! That technique is perhaps the kickstart that my stampin’ mojo has needed for a looooooooong time. Lately, I’ve felt like I do the same techniques over and over and over. This is truly unique and different. Thanks so much for the tutorial. Love your blog and visit daily! 🙂
Patty, Thank you ever so much for the tutorial. I just want to go right now and make a rose!! I am supposed to be packing to be ready to go to our SU convention. Hmmm might fit in one rose!! Yours are truly gorgeous!
Thank you, Thank you, THANK YOU! I just finished “playing” with the technique and love it! You are TOO kind to make a video for us! Did I say “Thanks”?
Those are so pretty!! Now I totally want that stamp!! Maybe next month 🙂
What a wonderful instructional video. So very, very beautiful. Thank you for sharing.
These are beautiful – I can’t wait to try this technique. Thanks for sharing with us.
Patty, these look like they just came out of your garden. Thanks so much for sharing.
So now I need shimmery paper! 🙂 This is gorgeous!!
You’ve just sold me on this stamp set. These are so romantically soft. Thanks for sharing! Just beautiful!
Well I thought I had already posted but didn’t see my name! And didn’t want to miss out on your blog candy. So here I am! By the way your video was great and I’ll be trying this technique over the weekend!
Thanks for the chance.
Diane
I’d love to have one of these. Girgeous Card and Fabulous tutorial.
Thanks,
Lee Conrey
Okay, so I’m hooked on these roses too! Thanks for your video! I’ve watched it several times. You’re the best!
Beautiful! Love the colors and the tecnique. Thanks for sharing.
Patty, I love your videos. They are always fun to watch and easy to understand. I cannot wait to get back home to my re-inkers!! I visit your site often and must thank you for all the inspiration. Keep up the fabulous work.
Judi
Beautiful! You are very talented.
Patty,
Oh my gosh another beauty!! I am so excited and ready to try this!! I love it!!!
LOVE LOVE LOVE
Krista Rill
Patty – thank you so much for sharing your wonderful talents with us. Your project is beautiful and the tutorial is really easy to understand! Thanks again!
Your cards are so beautiful! I appreciate so much your sharing them with us.
Just awesome!!!! I am in love with this stamp set. Thank you for doing this tutorial I’m inspired.
Oh my gosh Patty, those colors are stunning! Glad you included the video tutorial too. Thanks – praying to win some blog candy!
OMG, this is so beautiful. I was going to try it and I am so glad I watched your video first. Now I know exactly what to do, no wasting paper. Thanks so much for sharing this technique with us.
Candy Diaz
I am totally in love with this technique. Your roses are awesome and I appreciate you taking the time to share how to do these with us. You are a beautiful person!!
Blessings
Heidi
Thanks for the great tutorial!
This was a wonderful tutorial! LOVE how those roses turn out! Thanks for entering me in the Blog Candy running and congrats on the 2,000,000 views!
Beautiful!!! Thanks for sharing. I so want to try this.
Patty,
I have to tell you that your video made this so easy even my 5 year old son was able to make a watercolored rose. I’ll have his creation up on my blog sometime soon. Thanks so much for sharing this.
Kelly!
Your instructions are fantastic! As soon as I signed off the computer after watching this video I made two of my own! It was so EASY!! Great job!
This is absolutely beautiful! I don’t have this stamp set, but this would be so gorgeous to do with most of the other flowers in the SU catalog. I can’t wait to try this for myself! Thanks so much for sharing with us, Patty!
Oh Patty, this is a GREAT technique! thanks for showing us with instructions AND the video! Oh, and your “Oooh” and “Ahhhh” really cracked me up! ; )
This is possibly an all-time favorite. Perfect for the roses, but will try with other subjects as well. I would love to win the supplies to make one of these! Thank you for the opportunity.
BettyAnn
Patty – what a beautiful card and a neat technique, I can’t wait to try it!! Your video’s are great to watch too, very informative. Congratulations on your 2 million blog hits :o)
Kristen
WOW Patty! I was so impressed with your video! You did such a great job explaining how to make this card. Now I need get busy and order all the componets from SU, so I can try it myself.
Patty, Thank you for another great tutorial! I’ve watched and watched. Hopefully I’ll be able to do the same thing soon! Love your roses, both paper and from your garden!
Patty,
Congratulations on 2 million hits on your blog! The rose techniques are awesome and your cards are beautiful!
Thanks,
Jenifer
I LOVED this technique and plan to use it right away. It looks so easy so I can only hope mine turn out as beautiful as yours.
Hi Patty! I tried this technique using the flowers from the Doodle This set. It wasn’t quite as dramatic as yours, and I don’t have the knack for colors that you do, but it was still fun to try! Even though they’re still drying even now, I think I really need to get the white paper wetter. I just used white CS. Do you think there’s that much of a difference between reg. CS and the shimmery SU kind – getting the ink to really run and fill?
Talk to you soon!
Jeanne
Just gorgeous! Thanks for sharing!
Patty,
Your video tutorial is terrific. You make something so artistically lovely be so easy to do. I immediately had to try it out and even I could turn out some beautiful roses. Thank you so much. This is now my most favorite stamping technique yet. Love it!!!!!
hugs, monica
[email protected]
Huntington Beach, CA
Patti!! they are beautiful roses- it is obvious your love of roses and gardening have inspired you
thank you for sharing
Patty, the watercolor rose has to be one of my favorites. I will definitely be trying this technique; however, I’ll need to do it when my daughter is not home. She’ll try to copy and make a mess.
This just put me over the edge and I am going to order this set. I have been trying to resist, but now I ‘need’ it. Thanks so much for sharing.
Patty, Stunning, and amazingly simple. Thank you, Fern
Wow, this is absolutely beautiful!!
Love your videos!
This is the most beautiful watercoloured flower I have seen in along time. The colours are so vibrant and the technique so easy. I would love to borrow this for my next club meeting. They’re going to flip!!
Thanks for sharing.
karen
Thanks so much for sharing!!! These are amazing. I can’t wait to give it a try!
Patti – you are a continual inspiration! Great technique.
Patty, your colors are so vivid. I enjoyed watching how it was done. Thanks so much for taking the time to do this.
Rosie
Oh my goodness, these are just stunning. I love the colors you chose. Thanks so much for sharing!
Alicia
[email protected]
Hi Patty,
I’ve visited this particular posting several times, it’s so beautiful. The colors you chose blended as nicely as they do in nature.
Thanks for sharing you’re wonderful talent by posting the video tutorial.
Wow, what gorgeous roses! I’m a rose lover too, so I’ll be trying this technique soon. Love your video tutorials-keep them coming!
WOW! Can’t wait to get those reinkers opened! Thanks for sharing this!
That is one of the coolest things I’ve seen in awhile!! :o) I will definitely have to try that. Thanks for all your wonderful ideas…I love your blog!! :o)
Patty,
These are absolutely gorgeous!! You are always such a great inspiration. Thank you for sharing the tutorial.
Thank you for sharing your talent, what beautiful cards and your garden is amazing!!
It amazes me all of the wonderful creations you come up with. Thank you for sharing.
Lisa S.
Patty, those roses are almost as gorgeous and the ones you grow in your garden. Love the video of how to do the technique.
This is a fun technique. I can’t wait until my next workshop to show the girls. My dilemma is color choice. So far my favorite is summer sun and more mustard. Thanks for sharing all your information with us.
Oh Patty-
Those are so beautiful and you make it look so easy peasy. I will be trying this for some upcoming classes I have.
Patty!! I am loving the video tutorials!! The two rose techniques are easy..but impressive. I’m off to try the watercolor one out!
Patty, Thanks for the great tutorial…I hope to soon try this technique because it produces such beautiful results and looks so fun!
This is the neatest technique. I can’t wait to try it.
Patty
Beautiful card, thanks for the technique
tutorial. Love the colors
Hi Patty,
I love your Watercolor Rose video. I now understand how to do the roses. I learn a lot easier when I can see the process. Thanks so much for doing this. Your rose cards are just beautiful.
I love this technique! I did it this past w/e when I got together with my upline/sideline demo group! One thing that we did notice is that the embossing seemed to “stick” better when we used Versamark and the embossing powder. For some reason, our craft ink “lifted” when we went to watercolor it. I love your finished card with the Taste of Textiles paper! I don’t have any of that yet and it definitely adds so much to the cards with the white satin ribbon and the shimmery cardstock! TFS!
p.s. If you’d like to check out my sample, I’m including the link to my blog page:
http://jnielsen.typepad.com/stampin-sunset-to-sunrise/2009/04/did-you-catch-the-bus-yesterday.html
This is a beautiful card and the technique is really cool. I will be ordering this set to try it out!!
I love both of these techniques! Hard to say which one I like more – brayered or watercolored. I can’t wait to have time this weekend to try both techniques!
Cheryl Wilcox
Riverside, CA
[email protected]
http://lovetostampandscrap.blogspot.com
Your cards are so beautiful! This technique gives the roses a very real look – you can almost feel the velvety texture of the petals. Thanks for being such an inspiration.
The flowers look awesome and having the tutorial to go with makes it easy for us that need to see it done. Thanks again, can’t wait to try it.
What a great technique! I can hardly wait to order some of the shimmery white card stock so I can try it.
Thanks for making the tutorial Patty! The card is absolutely stunning!
Patty, you have made this look so simple, I can’t wait to try it myself. Thanks so much.
Jane B
Wowsers! Absolutely gorgeous!! Have to try this – thanks so much!
I love this and can’t wait to try it!! thanks so much for the great video!
I love this watercolor technique. I went looking at my stamps to see which ones i could use it one. I can’t wait to try it. Thanks for sharing your creativity with us.
great job, the roses are so pretty!
[email protected]
What a neat idea, the card is beautiful. I think I’ll try it in different blue tones, then layer onto different blue papers……monoch”rose”matic!
Your tutorials are wonderful, and your cards are AMAZING! Thanks for all your tips and inspiration, and all the time you put in to share it with ME and thousands of others that visit your blog daily 🙂 CONGRATS on a very successful blog!
Another Beautiful Card, and I can actually make this one now! I’ll have to give it a try, although mine probably won’t be as nice as yours! Thanks For sharing this project with us!
Love your blog! I check in with you almost everyday! Love your work, very inspiring!!! Thanks for all you do!!!!
Wow, so glad I found your site today. I am putting it in my favs. Thanks for the great video.
Dee
LOVE LOVE LOVE the roses. I love your blog.
[email protected]
Patty, what a real blessing you are to share your gift so freely with all of us. This technique is something I will definitely be using in my next workshop…and for Mother’s Day…and Birthdays…and…
Patty, this is absolutely gorgeous, and sounds really easy, although, I doubt I will
be able to make it seem quite so easy, lol.
thanks for sharing this tutorial and technique. I appreciate all you do.
ceashark at aol dot com
OMG! I just tried this and it works so well! I have pink roses everywhere!! Thank you so much patty on this technique that you are sharing. This is truly my favorite!!
Bobbi
Your roses are fabulous. I love the vibrant color. I can’t wait to try these.
Patty, congrats on your 2 mil hits! Well-deserved! Thank you for letting us celebrate with you with the blog candy! LOVE both of your latest tutorials – absolutely awesome! Becky K
Thanks for making this video. I was at regionals but it is so nice to have your video to refer back to. So often I get home from these events and forget how a particular project was done. I love your color combination as well.
Patty, I just recently was able to get DSL, so now I am LOVING your videos! I watched this one, made my own card, and posted a link to your blog from mine. You are truly an inspiration! THANKS!!
~Beth
Fabulous!!!!! Thanks so much for taking the time to share this with everyone.
It’s a good life!
Terri E.
Love this! Thanks for sharing!
Really very beautiful and amazing. The oohs and ahhs were in the perfect spot. I was skeptical at first but then it became clear how magical it really is. Great job!
Beautiful roses. Thank you for sharing your stamping work. I look forward to your blog posts.
These are very pretty. I cant wait to give it a try. Thanks for sharing, I love your videos.
Congratulations on the success of your business and blog. Your projects are beautiful. Your resources are invaluable! Thank you!
Hi Patty,
Thank you for sharing the watercoloring technique. I think I could make my own beautiful roses, too. It was like magic when you applied the color to each petal. I am also jealous of your garden of real roses. The colors are so beautiful and inspirational.
Patty, Your flowers are beautiful!! I can’t wait to try this technique. Thanks for sharing this as well as everything that you share. Congratulations on your 2,000,000 blog hits. I love your blog!!
Very Elegant Patty. Thanks for Sharing. Love the Video!
Hugs and blessings – Jean Fitch
Simply gorgeous! I love this new set. TFS
Patti,
What an awesome video. I love your website and all of your ideas and inspiration. Keep up the great work!
Wow! That is beautiful. This is why I visit your site every day. You inspire me. I just love the work you do.
wow that’s amazing! i will never go even near to your talent!
Such a great video, I love roses and use alot of my rose stamps too. Thank you for taking the time to make such a great demonstration.
Gorgeous! Can’t wait to try this.
Eileen
[email protected]
Your roses are beautiful Patty.
I am definitely going to try this watercolouring technique…it looks so fun and easy enough for me.
Not sure it will turn out as pretty as yours but I will try.
Patty, this is amazing. I never would have figured it out without being able to see how you achieved such wonderful results. Thanks for the video–those of us East Coast gals can’t always get to the Seattle regionals! Thanks for such inspiration!
Georgann
These roses are so beautiful. Thanks for all your great work!!! and CONGRATS on the blog hits!!!
Great cards. They are gorgeous TFS
Hi Patty,
These are gorgeous! I especially like how the textiles paper the roses are mounted on really make it POP!!!
Most beautiful… I have already emailed your technique to me customers! they Loved it too! Thanks for always sharing your ideas!
this is so awesome! I wondered why I didn’t see this and then I realized that you were at the Saturday session.
this is just incredibly gorgeous. thanks for taking the time to make a video to share.
I absolutely love this technique. I can’t wait to try this for my mother’s day cards. Thanks so much.
Debbie
Patty,
you are such an inspiration! I truly enjoy visiting your blog everyday to see what else I can learn! I just tried this technique last night with Elegant Eggplant and it’s beautiful!
I love your cards. Thanks for sharing your ideas.
This is absolutely beautiful! I know exactly what I’m doing for Mother’s Day cards. I can’t thank you enough for sharing these techniques. I visit everyday and am inspired to do more than I thought I ever could. Thank you so much.
Patty, these are gorgeous thanks so much for sharing all the time!! I am so blessed by you. I will be showing this at my Wow class. Thanks.
AWESOME!! Thanks so much for sharing a video!! I LOVE your work!!
Wow! This is surely a “WOW” card with the colors blending so nicely together. Thank you for teaching us how to make it.
WOW! I am surprised at how easy this technique is and yet it gives such a stunning effect. (I oohed and aahed with the prompts on the video!) Thank you so much for sharing!
How neat — first time I ever watched a technique in a video tutorial — loved to see the colors spread. Thank you.
WOW – so striking! I really didn’t think I would go for this technique, but after watching it I cannot believe how simple and striking the results are. Thanks again for all your wonderful inspiration!
Oh Patty, I love your blog. I thought I didn’t need this set or the matching embossing folder but you have changed my mine. I am off to place another order.
Great video!
Its beautiful!
Thanks for sharing!
Congratulations Patty on all your blog hits. I look forward to your blog every day with all your wonderful ideas and inspitations. This watercolor technique is absolutely stunning…thanks for the great tutorial and video. This would make a beautiful Mother’s Day card. Thanks for the chance to win your yummy candy.
Patty,
Just wanted to thank you for sharring this technique and doing the video. Your card tht you using this, they are just BEAUTIFUL!!
Enjoy your day!!
Denise from OHio
SU Demo
Phil4:13
WOW, this is great just gorgeous. What a neat way to color any outline flower. You are amazing.
Paula
Wow! Those are gorgeous! What a cool technique!
Patty, both of your tutorials are wonderful. I thank you for sharing your beautiful creations! I’ve been a “silent admirer” for a while now. I have your blog favorited, but recently I’ve been visiting Linda Hansen’s blog regularly, so I make a habit of hopping over to your blog from the link she has on hers. Isn’t that cool that she’s an admirer too!?! 😉
HUGS!
Kelly
Patty – very interesting Technique – sometimes I’m leery to try a new technique but you made this one look so easy I gave it a shot – wow is all I can say – thanks so much for all you do for us
Judy ~~~
I like this tute the best- it’s absolutely gorgeous!
Patty- you have the most lovely blog without being imposing or intimidating and yet, there are beautiful, inspiring and creative posts every day- what a champ!
I check every day and hope there is something that I can take away that will affect my day. There always is. And that’s all about THAT!! Love ya!
I love this technique. I’ll probably CASE it for my next workshop. Love your blog. Thanks for all the inspiration.
Stampin in the SON! jenni Hogan
[email protected]
http://www.strampinintheson.com
Oh WOW, Patty, your roses are just amazing! Thank you so much for sharing your talents and congrats on 2,000,000 hits!!
This is my favorite of your “Rose Technique” videos. Although I usually stay away from the whole watercoloring thing (out of fear), this was really not so bad. And these cards turn out beautiful! In person, they really do look like the flowers in your garden…very cool! I can’t wait to try it with different colors!
Patty,
Question – is the use of the shimmery white c/s a design choice or is there something special about that paper that works better with watercoloring than the regular c/s?
Great tutorial! I’ll definitely be trying this technique, too.
Heidi
I love this idea! Thanks for sharing!
Jonelle
wow! These are beautiful. Seems to take the stamping to an extra level. Your video was an excellent addition to the pictures on the blog.
What a great technique. Thanks for sharing!
I love your beautiful rose techniques and the gorgeous colors you used. Your photos of your real flower arrangements are stunning, too!
Patty, Your watercolor flowers are beautiful and look so much like your real flowers. THANKS for SHARING the technique and I am anxious to try it. It’s demonstrators like you that are willing to share that make stamping so much fun.
Your rose is beautiful. Thanks for sharing your talents.
Those cards are so pretty – thanks for showing us how to do it too! I might make it my mother’s day card 🙂 Deepa.Mishra (at) utah.edu
This is absolutely gorgeous!! What talent you have. Thank you for sharing
My 60th Anniversary card using your awesome technique. Thank you, Thank you Patty for sharing.
Fifth Ave. Anniversary: http://www.splitcoaststampers.com/gallery/photo/1333600?cat=16116
Stunning, stunning rose. I’m running out to buy all the supplies. Your video tutorial was so well done. TFS!!
Hugs,
Beth
Thank you so much for sharing this AWESOME technique and your GORGEOUS cards!!! I cannot wait to try it!!!!
WOW. So beautiful! And looks so easy too. Thank you for a wonderful tutorial!! I’m going to have to try that out very soon.
I *love* your samples and your tutorial! Thanks for the inspiration! What is the best way to clean the aqua painter when switching colors? I have been having trouble getting rid of all of the previous color.
Those are gorgeous!! Thank you for taking the time to share!!
~Spike
So gorgeous, I had to try this for myself. Mine are still drying but they are looking good. Thanks for a great tutorial.
Oh my these are gorgeous!!!!I am off to try this right now!!Tanks for the great tutorial.
Gorgeous technique. Thanks for sharing your video. I will have to try this as I love watercoloring.
Gorgeous…glad you did the tutorial.. would not have used the right cardstock!! TFS!
You have certainly inspired the creation of some gorgeous blooms … fabulous.
OMG……here is another card I made using your awesome technique. I made 2 of these Mother’s Day cards and also made up 6 kits for my SU hostess club party next week. I made these roses using watercolor paper, which is a little more forgiving. I thought it would be easier for a class. Love the results. Enjoy and thanks again Patty for getting me hooked 🙂
Mother’s Day Top Note Rose: http://www.splitcoaststampers.com/gallery/photo/1337685?nocache=1
Awesome. I’m on my way to work on it now. Thanks for the tutorial
Wow! Ok. Sooo glad that Andrea Walford linked to your video! Stunning! I really can’t wait to go try this method myself. I took 2 water color classes and this is by far easier!
Thank you, thank you, thank you.
http://www.stampingwithprincess.wordpress.com
Hi Patty!
I am new to your blog. These roses are stunning! Can’t wait until I get my set in the mail this week!
TFS!
Diane
Those are just stunning!! I don’t have too many reinkers but I will try with what I have.
Thank you for this. I have passed the information along on my blog, with a link to this site. Hope that is ok. Amazing technique I am sure everyone will love.
Thanks and wonderful work.
Linda (South Australia)
These are just awesome Patty 🙂
I wish I had found your tutorial before I
did my own version!
Thanks for the video.
Patty, those are just beautiful. They remind me of the roses my grandfather used to raise. Thanks for sharing, now when I get home frmo work tonight I will have to try that technique
You rock! What beautiful work, great tutorial – thanks so much for sharing!
Cathy
Hi Patty,
I saw somewhere online the real name to this technique, not sure if you posted it or someone else, do you know what it is really called.
thanks in advance
Hi Patty,
I just saw your video on this blog http://stampinoutloud.blogspot.com/2009/05/this-technique-originated-with-crystal.html just wondering if we are allowed to post your video up on our blogs
Wow!! Thanks for the wonderful tutorial. I just made my first rose and it made such a difference to see how you did yours. Thanks for all the work you put into your tutorial.
Patty — thanks for the great tutorial! Here’s something that I made this afternoon. http://www.splitcoaststampers.com/gallery/photo/1357251
I have yet to get the Peace rose right, but I’m still working! I also want to get the color of Chicago Peace — one of my favorites.
Patty, Thank you so much for sharing your watercolor and brayered roses with us. They are absolutely beautiful!! I can’t wait to try them myself!
Thank you, really enjoyed this tutorial, so went and played and really pleased with the result for a first effort.
Thoroughly enjoyed your tutorial ! I’ll have to try this technique thank you for sharing it. X Fab
I can’t believe I haven’t watched the full tutorial until now! Wow.. Patty, thanks for sharing this magical technique! I’m going to have to revisit it!
Love this tutorial…..here in downunder Australia we don’t have shimmer white paper, would this work on the whisper white or watercolour paper?
Awesome!!! Thank you for making a 72 yearold crafter sooooooooo.. happy
Great tutorial! Thank you so much…I’m off to give it a try!
Thanks so much for the video. This technique and your use of colours is gorgeous!
Patty, this is really beautiful. Could you please tell me though whether you have tried doing it on other paper and how it turned out. I’m in Australia and unfortunately we don’t have the shimmer paper for some strange reason.
Kathy
Thank you so much for sharing this wonderful technique with us Patty. It has certainly provided me with lots of inspiration to experiment.
Oh, my goodness! These are beautiful! I found out about you and this technique from Dawn’s Stamping Thoughts. I have got to try this. Question: Are there any other Stampin Up! stamps that would work well for this technique? For instance, the others in the Fifth Avenue Floral set? I can’t wait to try it, but I’ll have to buy the set first.
your water colour rose technique is simply superb, i liked it very much
wow, Patty this is an amazing tutorial….. your cards are gorgeous…
Thanks for sharing the information.
hugs…
Pat Rose (aka kokirose – on Splitcoast Stampers)
You make it look so easy, and gorgeous! But what’s your secret? I tried and followed your instructions, but my ink bled all over the place, the embossed image didn’t stop it and I also used the 5th Ave floral Rose..hmmm I’m hoping you can give me a tip
You have to get know that I every time buy essayand buy research paper at the essay writing services and students buy essay writing referring to this good post . Thank you a lot for the great stuff!
Great tutorial. Thank you!
What a great technique! Love it!
Patty, this is a beautiful card and great tutorial. I’ve tried this technique and it didn’t turn out quite as well as yours did, but guess I’ll try it again. This tutorial has inspired me. Thanks you. Edna B.
Hi!
Wanted to let you know I posted a link to this tutorial/video on my blog today.
Nancy Ward
http://www.nancywardcrafts.com
Hi Patty i was going over some of the old emails i have saved from you that i wanted to make and ran across this one. I want to do it with my card group but I’m not sure how you add the clear embossing. I mean when, I do know how, i understand that you stamp with the white craft ink and then you say the clear but do u go right over the craft white stamped image? If so how do u tell where your stamping? Does this make any since? please help…LOL. thank you.Veronica