Thank you for all your fun comments and enthusiasm about the File Folder Note Pad Holder in yesterday's post!! This idea was originally in the August edition of the Demonstrator exclusive magazine called Stampin' Success. Stampin' Up! gave some instructions by phone and I received one of these from my fabulous downline Cindee at Convention, and then I came home and altered the instructions a little.

TIP: to make one, I'd suggest starting with a plain manilla file folder for practice, then use the Stampin' Up! File Folders.
Note Pad Folder instructions
as seen in the August Stampin’ Success - page 26
Altered by Patty Bennett
1. Open folder, so you’re looking at the inside. Label tab will be on your right-hand side.
2. Score 1/2” to the left of the existing center score/fold
3. Cut 2-1/4” off left side – measuring from the tab.
4. Cut off excess ¼” along the bottom edge of the right side. (Part of the file folder on one is ¼” longer than on the other)
5. Cut tab off right side.
6. Open folder and place left edge of folder at 12-1/2” and score, then move left edge of folder over to the 13” mark and score again. You will now have 4 vertical score lines (SEE PHOTO)
7. Score horizontally 3-1/8” up from bottom edge.
8. Cut notch in bottom right corner (with scissors or cutter) where the horizontal score mark and vertical score lines meet. This transforms the right side into the flap of the notebook. SEE PHOTO.
9. Fold bottom edge up along horizontal score, use a bone folder to give this a good crease.
10. Fold on all vertical score marks, using a bone folder. SEE PHOTO.
11. Open bottom flap, put sticky strip at far left and far right (SEE PHOTO), fold up flap and secure with Sticky Strip to form pockets.
12. Insert notepad into right pocket. These are mini legal pads from Staples, approx. 5"x8".
13. Adhere Velcro dot to flap and secure folder shut.

(does anyone know how to draw a dashed line in Photoshop Elements?? I couldn't figure it out).
Click to enlarge photo as needed.

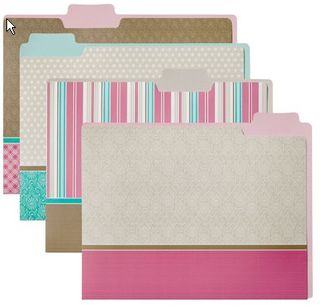
These are the file folders before they are altered (item 115692, pg 169):
What a fun project this was!! I mailed one to each of my downline who completed my most recent Incentive Offer… way to go gals! 🙂


Patty – this is such a great idea! Thanks once again for sharing your creativity with all of us!
Love your tutorial. Thanks for linking my blog to yours.
what a great idea, I’m gonna try it out.
OH you know how to make a girl smile on a Friday afternoon I tell you! Thank you darling! 🙂
Adorable project, Patty!! These folders are super-cute already, but this really pushes them over the edge. Thanks for sharing!! See you at Founder’s Circle next month!!
Kim
Hi Patty,
Cute tutorial. I was wondering where you got that cute shopping cart next to your siggy?
You did an amazing job Patty. Thanks so much for sharing, such an inspiration.
Thanks so much for sharing. When I first saw this, I knew I had to make one of my own. So clever. It was was nice to finally meet you at Convention.
Thank you! Thank you! I won these from the Prize Patrol at Convention and really didn’t know what to do with them because they were too cute to stick in a filing cabinet! Off to make them now! v
GREAT tutorial. I can’t wait to try this. Thanks for sharing.
Gladys
Grand Rapids, MI
Hi Patty!
Thankyou so much for the tuorial for these! Just adorable!
I will make some as a Downline incentive!
Thank you for sharing!!! These are great!!
Thanks Patty! I obviously must have dozed off before page 26 of the SS!! Ha ha! I didn’t remember seeing these!
I just wanted to thank you for continuing to post tutorials for free. It is of great help to us demos with small customer bases but big ideas! It really IS all about sharing and helping others. Thanks!
This looks like a wonderful project! I can’t wait to try it!
Thank you for the Tutorial.
Thanks so much Patty! Hoping to steal a few minutes tomorrow to make them!!
Thanks so much for doing this. I can’t wait to try it! :o)
~*Priscilla Aguilar*~
http://faeriedreamsandpaperwishes.blogspot.com
Thanks so much for sharing this terrific project with us !! I made one today and it was so easy! Just a little note about an extra that I added – use the tab you cut from the right side to make a pen holder. I stuck the ends together with sticky strip and then used another piece to attach the loop next to the score line to the right of the tablet (looking from the inside). It will easily hold one of the RSVP pens that you can add coordinating cardstock in the barrel of.
Thanks again,
Laurie Gibson
Vestaburg, MI
Patty,
You rock! I have always loved your ideas. You are an inspiration to us all.
Kathy
http://www.sassystamper.blogspot.com
Patty – I love you! Is that too strong? 🙂
Thank you for sharing this tutorial with us. It was so easy to make & I can think of so many occasions for them. I’ll be making some for our church’s annual craft sale.
This is great! I did one in about 7 minutes!!!!
Thanks for sharing this idea!
Lori
Thanks so much for the wonderful tutorial; I will be making these for the “office girls” You are so wonderful about sharing; thanks again! Mary Jo
LOVE, LOVE LOVE this! So pretty. Thanks so much for the tutorial.
This is a really great idea. So many people would enjoy keeping these on their desks. Thanks for the tutorial.
Thanks for sharing the directions to make this really cute project. Which letters did you use for “notes” on the front cover with the build-a-bear?
Dashed line tutorial
http://avondale.typepad.com/pixelupdate/2004/09/how_to_draw_a_s.html
Fabulous idea!
Although it has been months since you posted your tutorial I finally made some this week. I love them. I did one on my own – following your directions I didn’t even use a practice folder – and then my friend and I did one when we got together for our weekly crafting afternoon. I know the Thoroughly Modern ones will retire with the current catalogue, but I am hoping SU will still have them in another design. Thanks so much fo sharing your work. I posted a photo on my blog today.
Got your comment – sorry about the email. It popped up when I had a look back here and saw that I missed the “a”. I either have a very lay little finger or the “a” on my keyboard sticks. Thanks so much for you comment.
Thanks so much for sharing this terrific project with us !! I made one today and it was so easy!