
 I thought you might like to see some of the step by step photos I took at the PURSE CLASS last weekend…
If you'd like details on making a bag, view ANGIE's VIDEO HERE, or purchase ANGIE'S instructions HERE.
If you are looking for someone to make you a purse, VIEW THIS POST for Lisa's info. You can also contact BARBARA at [email protected] or CLICK HERE to see her purses for sale if you wish to purchase a completed purse.
So… here we go…
We cut the fabric into strips, 5" wide, and layered it onto the Scallop Square die, then ran them through the Big Shot. It will cut 8 layers of fabric if it's regular weight cotton, or I did 6 layers since this was heavy weight cotton.

Lots of activity and fun….

We pinned the scalloped layers together with the batting squares inside.

Hey.. I'm REALLY SEWING!! Thanks to Cindee for letting me use her machine.. as mine is from Jr. High in 1972 and I wasn't sure if it still works…


Sew the 1st part of the X on each square.. making a long chain of them. Then cut them apart and sew the 2nd part of the X on each square.

Cut apart the chain of squares and lay them out in the pattern you'll use for your purse. You'll notice they all have the stitched X in the center.
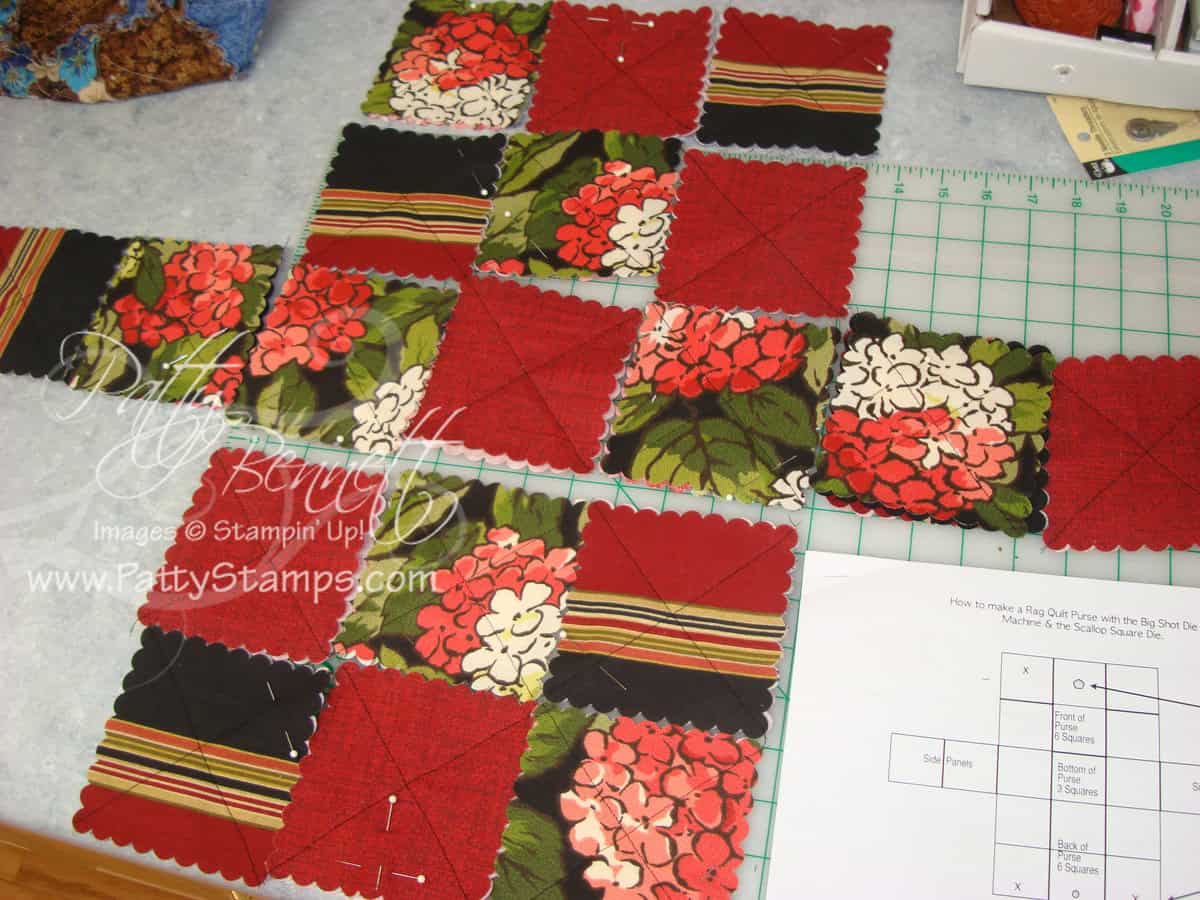
TIP… I made a "T" with 2 pins to indicate which square was my top center square… as you have all these squares floating around, it can get confusing as to which one was at the top …
I added a pocket flap to each side:

All the squares are now sewn together.. and when the sides are stitched you have a purse!

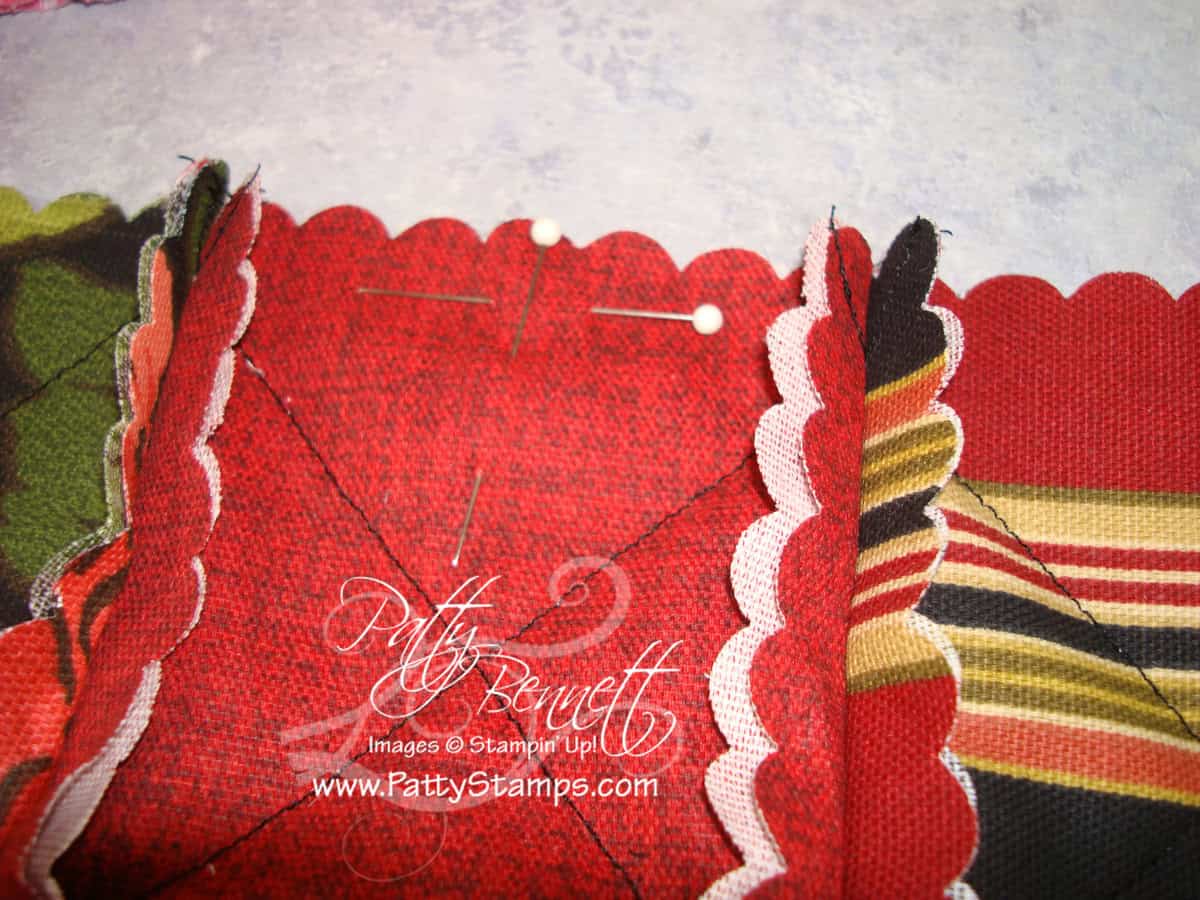
Here is how the pocket turns out on the side:

Handles and closure strap pinned in and ready to stitch all the way around the top:

Finished purse with a matching Big Shot flower!!! whooohooo!

The purse uses the Scallop Square Die and the Big Shot. I was easily able to cut 6 layers of this heavy cotton at once with the die.. it makes the project go so quickly!


Big Shot, item 113439 Scallop Square die, item 115950


What wonderful instructions! I am going to HAVE to make one of these!!! I love your choice of fabrics and the pocket – wonderful idea. I also want to see more pictures of that craft room that you were sewing in!! Looks like it is awesome.
Patty, thank you from the bottom of my heart!! I have been looking for these directions forever!! My PC is so old and my internet connection so bad that I can never get the video to work, plus I can’t remember by the time I get downstairs (away from my PC) to complete the project. You are such a blessing to all of us because you share all of this for free, even tho you had to pay for the class. Plus the amount of time it takes you for every one of your tutorials. Sorry this is so long, but it isn’t even a fraction of how thankful I am. Big hugs to you, Sandi
You did so well, you may have to invest in a new sewing machine!! :~}
Thanks for the great pictures.
Marty
Thanks for the step by step tutorial on these bags…simply fabulous! I’m going to have to buy some fabric and get started on my own. 😉
What a cute purse! I love the fabric you used.
I have seen these purses and I have resisted the urge, but I feel like you are all part of “The Borg” saying “Resistance is futile”! (See Star Trek: The Next Generation for The Borg if you don’t know who I mean.) Guess I should know better than to try to resist…
Thank you so very much for taking the time to write and photograph this tutorial. It is such a great help. You are so generous. Once again, I really like the way your purse turned out. I wasn’t sure on the pocket, but now you have made it perfectly clear on how to add it. If one could keep thier head on straight they could even add a couple to the inside. I think that you should see if your machine works or be on the lookout for a new one, now that you have made one, I bet you will be making more, especially when the Holiday Season comes around. Hee, hee. I just may have to jump on the bandwagon and whip up a bunch for myself, even though I don’t carry a purse. They do make a very nice gift. They can’t be that expensive to make either. What did yours take? A yard of fabric and a 1/2 yard of batting? You could always use batting leftovers, if you have them laying around. Well that’s enough chatter from me today, except to say…whomever’s house you were at, they have a wonderful studio. I can only wish for a nice one when I grow up. Lol. Have a wonderful day.
Trish in Wisconsin
You did a wonderful job. Love the idea of the outside pocket. I was thinking of adding some to the inside as I have been making several for my other Stampin’ Up! buddies for their birthdays. My question is how long was the class as I have been debating whether to have one. I’m assuming everyone had to bring a big shot and sewing machine. Which you then need the space for it. A big undertaking for your downline Cindee. Love your blog and visit it regularly.
Patty,
You did a beautiful job on your purse….you need to get a sewing machine again as I can see you making more purses. The colors you used were so vibrant, I love that! Also thank you for your tutorial of the purse. I, like others, have older computers and never get to view the videos that demonstrator show. Thanks again !
Wow, look at all those Big Shots! Love the colors you chose, and it turned out great!
Thanks so much for posting these!! I have never seen such an incredibly beautiful collection, and I can’t wait until they arrive in the stores. I adore every single one of these bags .
Great job! I love that fabric!
Thank you so much for sharing this, Patty! I have shared the link with my customers – just no room for a sewing machine and to store fabric here – I wish I could do more for them.
Patty, great job on the purse. I’ve made one too a few months ago. What did you use for the handles? It looks textured.
This is the most awesome thing I have ever seen. I have heard people using the dies for fabric. But oh my. This is way over the top. I am loving this idea. Great job!!
The personal loans suppose to be very useful for people, which would like to ground their own company. As a fact, it is easy to receive a bank loan.