
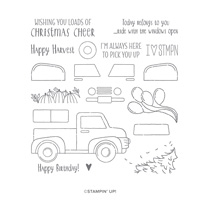
Without a doubt, one of the most popular new Stampin’ Up! stamp sets is the Ride with Me truck set with the matching dies to make an adorable 3D truck!! I decided to get my feet wet with this set and just make a card first before I create the cute little 3D trucks.

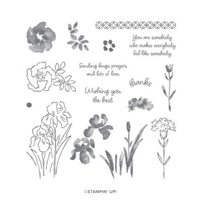
Of course, I HAD to add flowers to my truck! I had the Inspiring Iris set out on my desk to use on my next project and voila.. Ride with Me and Inspiring Iris met up to create this cute card!!

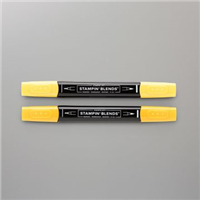
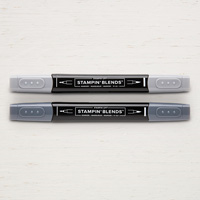
I stamped the truck with my Memento black ink pad onto a Whisper White piece of cardstock, and colored it with my Stampin’ Blends Markers: Mango Melody, Daffodil Delight, Real Red, Basic Black and Gray Granite. I also used Light Pool Party for the window.

I die cut the truck with the Rectangle Stitched dies, layered it onto Daffodil Delight, then onto a piece of Terracotta Tile cardstock embossed with the Brick & Mortar embossing folder. The card is on a So Saffron base card.
Do you love this fun Brick and Mortar embossing folder!? Remember, you can earn it FREE with my limited-time offer!! CLICK HERE to read all about it in my customer newsletter!!

Find it in the catalog / in my online store:
(all page numbers refer to the 2019 Stampin’ UP! Annual Catalog)
- Stampin’ UP! Ride with me stamp set #149312, page 55
- Stampin’ UP! Inspiring Iris stamp set #149268, page 111
- Stampin’ UP! Stampin’ Blends markers on page 179 or HERE online
- Stampin’ UP! Brick & Mortar embossing folder #149643, page 198

CRAFT TIP!
Be sure to use Mulitpurpose Liquid Glue when adhering an embossed piece to your papercrafting project. I laughed at how messy my glue was…. do you apply it like that? Or are you methodical with lovely straight lines of glue?

Extra Added Touch… stamp and fussy cut one flower to add to the truck bed 🙂

Final Touch: Happy birthday was stamped in Real Red ink onto a die cut and added with Stampin’ Dimensionals. The greeting is in the Ride with Me set, and the banner die is from the Smooth Sailing dies #149576. You can purchase ANY of these Stampin’ UP! supplies in my online store by clicking any of the product photos below!
Want to leave a comment? Please CLICK HERE.

Watch my helpful online ordering video HERE with tips for shopping online.


Want to leave a comment? Please CLICK HERE.

Shop Online Anytime and Earn FREE STAMPS
SHOP and SAVE: Last Chance List
Join my Luv 2 Stamp Team of demonstrators – click for info
All my Favorites on Amazon - as an Amazon Associate I earn from qualifying purchases.
Sign Up for my Customer Newsletter
MY FREE VIDEOS tutorials


Beautiful card Patty!!!
I put my adhesive glue on messy, all over and I use my finger around the edges to get great stick down.
Ah good tip to use your finger!!! 🙂
Love that truck stamp!!! And your fussy cut flower really adds a lot! Hey, I missed seeing you on the incentive trip & hope you’re all doing well!
Oh thank you Cheryl!! I loved your photos from the trip. We opted out of this trip. All is well, just here working away. Glad you enjoyed the card 🙂
Sorry for the off topic comment but I didn’t know where else to ask.
I want the August Paper Pumpkin. When is the earliest date I can get that so that
I don’t accidentally get the July Paper Pumpkin?
Hi Darcy, when you subscribe to paper pumpkin between July 11 and Aug. 10 you will get the August kit. http://bit.ly/PattyStamps_paperpumpkin
Adorable! This is a really cute card. Thank you for sharing. I want to buy it all! LOL
Thank you Debbie.. so glad you enjoyed it!
Adorable! How did you stamp the flowers in the truck bed? Stamparatus? I’ve been a long time admirer of your art!
Hi Jane, I just used clear blocks and ink pads to stamp them. I masked the truck bed with a post it note first. 🙂 Thanks for your kind words!! 🙂 You made my day!
I like the truck of flowers……. I am having a lot of successs with using a sponge to apply multi murpose glue. I cut a sponge in half and used a small clip to one end as a “handle”,