
If you are wondering how to attach your die cuts or stamped images to the new Bird Ballad Laser Cut Cards, I have a Video Tutorial with Tips to share with you today!!

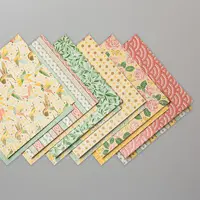
I truly love these cards, and wanted to share all my tips with you!! I started by fussy cutting the roses and hummingbirds out of the Mosaic Mood designer paper, and then stamped a die cut from the Wild Rose dies with a sentiment from the To a Wild Rose stamp set. I simply layered these pieces together and placed a punched circle on the back site… that’s the secret tip!!!! These are SO EASY! Be sure to WATCH THE VIDEO below to see how easily these cards go together!


Simply use your Paper Snips to cut out the roses, butterflies or hummingbirds you wish to use on your cards.
Shop:

TIP!! Use a circle punch or die cut circle behind the laser cut card front to help secure the die cut on the front! Watch the video to see how it’s done!

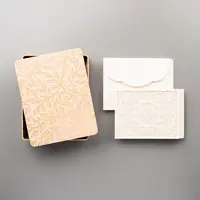
Use the beautiful tin for giving a set of cards or other gift to a loved one or friend! Such a bonus.. I love these laser cut cards with tin!!

- Bird Ballad Laser Cut Cards #149595

- Mosaic Mood designer paper #149478
Whether you orient the card vertical or horizontal, my tip with the circle punch on the back of the laser cut cardfront works just great!! Be sure to watch the video to find out how easy these cards are to make!

Watch the Video:
Want to leave a comment? Please CLICK HERE.

Watch my helpful online ordering video HERE with tips for shopping online.


Want to leave a comment? Please CLICK HERE.

Shop Online Anytime and Earn FREE STAMPS
SHOP and SAVE: Last Chance List
Join my Luv 2 Stamp Team of demonstrators – click for info
All my Favorites on Amazon - as an Amazon Associate I earn from qualifying purchases.
Sign Up for my Customer Newsletter
MY FREE VIDEOS tutorials


Good morning Patty,
I love your cards and thank you so much for the video…. I have these laser cuts coming on Monday and I’m so glad you told us the tips….I love the tip with the circle behind……. I wouldn’t of known what to do………I just love these laser cut cards……I’m heading in an hour to see my oldest sister in Virginia…. It’s a 6 hr.drive but I wanted to check in before I left….Have a great weekend and I will catch up with you on Sunday night….
So glad you enjoyed the tip!!! Have fun with your sister.. enjoy your new car on the ride!! 🙂
Beautiful! I love the idea, but you would have to be very careful where you write on the inside of the card or it will show through the front of the card! Why not adhere the So Saffron piece to the back of the laser cut front? You can put your adhesive behind those gorgeous cut outs from the Mosaic Mood DSP and in the corners of the laser cut piece! Just a suggestion for those who want to write a note inside or for those who would be concerned about placement of their inside sentiment!
Yes, you can totally do that but I wanted to be able to see through the laser cut details… either way works great!!
Thank you Patty for your ideas and thank you Juleen for your idea. both of you have great ideas.
You did it again coming up with this great solution. Thanks Patty.
Thanks for the GREAT tip! Love the cards, so pretty!
Those are GORGEOUS! Great tip putting the circle on the back to attach the image & sentiment too! SO AWESOME! Thank you!
Beautiful cards! Love to follow you, thanks so much for showing us beautiful!!!