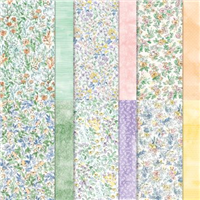
Oh these beautiful springy / Easter colors are just marvelous! The Stampin’ Up! Hand-Penned designer paper is gorgeous and just perfect to show off 2, 3 or 4 patterns on each of the Double Triangle Fun Fold cards!
Watch the video!
Be sure to check out the quick video at the bottom of this post for all the details!
Wait until you see this card “in action” on the video below.. I love the way it opens up after sliding off the belly-band!! It’s amazing AND super easy! I was surprised at how easy it was to create!!
Dimensions & Supplies for the Double Triangle Fun Fold card
Thanks to Kurstan for sharing this card design with me last month! I love it!
I tried to use most all of the patterns in the Hand-Penned designer paper pack to show you a variety of the colors and pattern combos possible!
Hand-Penned designer paper is available online #155499. MY GUESS is that it will be on the Annual Catalog Retiring list next week, but we don’t know until we see the list and the new catalog!
As I mentioned in the video, you can use ANY paper patterns, any colors, make these for ANY occasion, holiday, etc., and use any die cut or punched shaped in the center on the belly-band. The double triangle fun fold is a very versatile pattern and super easy to make once you’ve made one or two!!
Clearly, once I started, I could not stop!! 🙂 I loved making as many of these cards as I could find Hand-Penned designer paper combos for!
I was just thinking.. these would even be so pretty for a bridal shower or baby shower invitation!
Please Enjoy the Free Video Tutorial
If you are reading this in an email, you many need to view the video on my blog post, or on my YouTube channel.
I love to read your comments! To leave a comment Please CLICK HERE.
Want to leave a comment? Please CLICK HERE.
Shop Online Anytime and Earn FREE STAMPS
SHOP and SAVE: Last Chance List
Join my Luv 2 Stamp Team of demonstrators – click for info
All my Favorites on Amazon - as an Amazon Associate I earn from qualifying purchases.
Sign Up for my Customer Newsletter
MY FREE VIDEOS tutorials









All of the Hand-Penned cards are beautiful! How many cards do you think a pack of DSP would make? Thank you.
Joanie
If I’m doing my math right, looking at the dimensions I provided for you above, I think you should be able to get about 20 to 24 out of a pack.
Beautiful Cards! This would also be great for a wedding or get together invitation.
Yes, of course! Like I mentioned above a bridal shower too. So pretty!
Love this card! Thanks for sharing.
Thank you Jeanie!!
These cards are beautiful –
Thank you!
Beautiful cards!! I’m going to make one today, thanks for sharing!! I love watching your videos.
Thank you so much Gail!! Have fun making one!
Thank you so much for sharing your beautiful card!!!
So glad you enjoyed it!!
Love these cards and the paper. I do have a question though. Where did you get the ruler at the top of your trimmer? I have a lot of trouble reading mine.
It’s called a reverse self adhesive ruler and can be found on amazon. I love it!
Love these cards and you’re right: they look complicated but come together easily. A question: your demo card shows the piece of DSP flips up to reveal a piece of white with a stamped image. I didn’t see how you did that in your directions though. Could you explain? Thanks!
Hi Kim, when you open the folded white layer, stamp the floral image inside.
YES, that is the 4×10 white cardstock folded in 1/2.
Hi Patty, wow, great video and love the fold, thanks for sharing…your the best..!!!
THanks for watching, Janet!!
So beautiful and you make it look so easy. I will try it tonite. Thank you so much
for all your inspirations–I love to watch you.
Hope you had fun creating!!
Absolutely love all your variations!
THanks Tana!!
Beautiful cards ! Love this paper because of the pastel color and fine lines and goes so well with this style of card. Thank you for showing how to put card together !
Thank you, so glad you enjoyed it!
Beautiful cards and you explained everything so well!! I can hardly wait to make these cards! Loved your tutorial and will definitely be back for more!! I’m a demonstrator for about 14 years, will definitely be doing this in class!!
Have fun sharing it in class!!!
Wow Patty! I love this card design. Thanks for sharing.
Thank you Sandra!
So beautiful and the hints and put together was so helpful. Thanks for sharing!
Thanks for watching, Kathy!!!
Beautiful cards, and love this fun fold! Thank you for sharing from Ontario.Canada
Thank you Jeannette!!
Beautiful cards and so easy. Thank you for sharing
Glad you enjoyed it, thanks Julie!
Patty this is a marvelous fun fold. Thanks sooo very much for sharing your video and teaching me a new fold. Love it 💕
Thanks Patti!!
O my gosh – i loved the 2 classes this past week. I already made a diamond fold card for my sample file and plan on making a few of them. I loved the sand and ocean and trees too. Coming from South Africa, I really miss living near the ocean. Utah is not quite the same … but our sons are here – so Oh well. .. I get to CA at every opportunity.
Thank you Shann!!
Thank you Patty. I love your cards.
So glad you enjoyed it Joan!!
Hi Patty, These cards are so pretty and I love this DSP. I do have one question on these. I see at the start of this video the white cardstock opens up to a place to be able to write in. Did your cards have this too? I didn’t see you open it up in the end and I wanted to be sure I understand where to attach the folded squares so it doesn’t interfere with the center mechanism. Thank you,
Yes, they are all the same.. the white card opens up and you can stamp and put a message there.
Patty! Thank you for this video. Much appreciated!
You are most welcome.. thanks for watching!
Very pretty! Thanks for the great tutorial!
Good afternoon Patty The Easter Card I have in mind is a little bit bigger than this one . The cards that I make are 10″ x 7″ scored at 5″. Would this beautiful card work for that size 5×7 and if so what would the measurements be for that size? Please let me know
Thank you
Sheila Livingston
Hi Sheila, Gosh, I’m not sure.. I would start by cutting some triangles from scratch paper to see what size looks best on your larger card. When you have the size, then you can cut them from DSP.
I love this card thank u
One could make masculine card if one had the paper that was considered masculine