
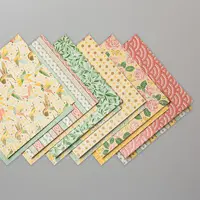
Have you tried this amazing Floating Frame Press’n Seal technique for cardmaking? Cindee and I created these cards with the Stampin’ UP! Mosaic Mood designer paper and the Press’n Seal technique!!

We fussy cut the yellow rose images, butterflies and the hummingbirds from the Mosaic Mood paper, then used those for our 2 Floating Frame cards. Check out the directions and video tutorial links below in this post for all the details on this technique.

How to Make the Press’n Seal Floating Frame Card:
- Stamp and die cut, or, fussy cut images to use on your card. Lay them out on the card front.
- Apply a piece of Press’n Seal to the pieces, press down, and be sure the Press’n Seal is holding all images in place
- Flip over and use paper snips to trim away all excess
- Check the design on the front, making sure everything is where you want it
- Use a die shape of your choice to cut out part of your card front (I’ve used a Stitched Square die as shown in #5 above)
- Peel up the Press’n Seal, with the pieces attached
- Flip the piece over and adhere LOTS of dimensionals to the cut out pieces
- Flip back over and adhere to card
Floating Frame Press’n Seal Video Link:
Watch Bruno’s video HERE for more info on how to make the Press’n Seal card.

As you can see above and below, the Press’n Seal card technique makes 2 cards.. one with the center die cut piece (below) and one with the left over Floating Frame piece (above). I added the additional butterfly above just to fill in that extra space. I kept that card simple, just matted on a Thick Whisper White card base.
Below, I matted the die cut square onto a larger white square, then onto a 4×4 piece of Mosaic Mood designer paper, then onto a 4-1/4″ square Mint Macaron card base.

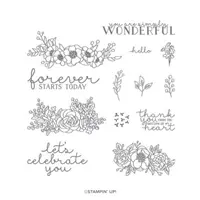
Both of the greetings on my Mosaic Mood cards are from the Bloom & Grow stamp set, stamped in Early Espresso ink.
Do you love them!? I do!! Let me know if you try this fun technique!
Want to leave a comment? Please CLICK HERE.

Watch my helpful online ordering video HERE with tips for shopping online.

(Press’n Seal is available at Target, KMart, Walmart and on Amazon)


Want to leave a comment? Please CLICK HERE.

Shop Online Anytime and Earn FREE STAMPS
SHOP and SAVE: Last Chance List
Join my Luv 2 Stamp Team of demonstrators – click for info
All my Favorites on Amazon - as an Amazon Associate I earn from qualifying purchases.
Sign Up for my Customer Newsletter
MY FREE VIDEOS tutorials


BEAUTIFUL! Got my paper samples today and must try this out. Also, has anyone ever tried the gluing technique where you put some liquid glue on the silicone mat and use a damp sponge to dab it onto cutouts and lace? I tried it and it really works well!
Yes, I have included that technique on a few of my videos. I love doing that!
love it thanks for sharing.
Jennifer McGuire came up with this technique a number of years ago Her husband invented press and seal
Wow.. did not know that about her hubby!! amazing!! I think Bruno’s video references her above.. thanks for the cool info!
Thanks for sharing Bruno’s videos Patty! You are a sweetheart. Xx
Good morning Patty,
Your cards are gorgeous…. Wow this looks like a fun technique. I’ve never tried it but I’m going to today……Thanks so much for the video…. Oh and someone I know has a birthday coming up….lol……Thanks for sharing and have a great day
So glad you enjoyed the idea!! It really makes a super special card!!
Yes, big birthday next week! : ) Thanks for the well wishes!